
| ... From 19 |
| Add Image Tool » Variations in the HTML Code inserted | |
|
The HTML code inserted into the post when you use the "Add Image" tool button to insert an image into the post. This code can be viewed it in the HTML mode.
• Variations in the Code Inserted
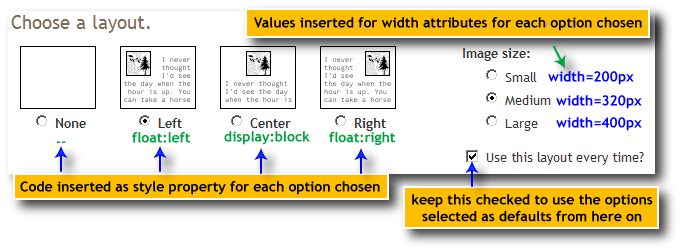
Depending on the layout and the size options that you choose for the image while uploading, you will find the following variations in the code inserted.
The variations are in relation to the value of the width attribute and the style property float within the <img width="__" style="float:__ ..."> tag. After the image is uploaded, you can alter these if you are comfortable with handling HTML code.
The size options that you choose here would not affect the actual size of your image/photo. The actual photo that you are using would be uploaded as it is. When the image is being displayed within the blog post, it would be resized to the chosen width. This will not affect the original file and its dimensions. The <a> tag surrounding the <img> tag makes the image work as a link to the original image file. If you display the image using this link, it will be displayed in its original size. • Setting Default Layout and Size Options
If you are using the add-image tool to insert images into your posts and if you intend to use the same layout and size options every time, you may choose to set the present options that you choose on the upload window as default options for your user account.
Whenever you access the image upload form/page, these options would stay selected for you instead of the regular defaults. To set the options selected for upload as default, keep the "use this layout every time" check box checked before you click the "upload" button. |

| Selecting the image | |
• Compose Mode
You can select the image by clicking on the image. A thin border would appear around the image (the image bounding box). At the corners and the central locations of the border, square empty boxes would be displayed.
• HTML Mode
Selecting the image in HTML mode does not have any sense. The image is represented by the <img> tag with the required attributes within the tag.
|

| Repositioning the Image | |
• Compose Mode
Click, Hold and drag the image to reposition it anywhere you want it to be positioned.
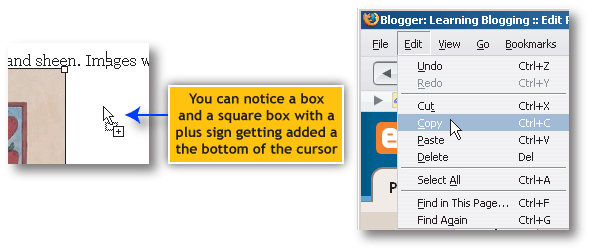
As you drag the image you can notice that the mouse pointer changes its shape
The location where you leave the image to be repositioned can be identified with the cursor that moves along with the mouse pointer. Depending on where you leave the mouse pointer and how the alignment option is already set, the image gets repositioned. You may also use the following option to reposition the image
Repositioning the image would not change the alignment option that is already set for the image. [Say, if the image is right aligned, then you can only reposition the image as a right aligned image.] • HTML Mode
To reposition the image, cut the code relating to the image i.e. the <img> tag and paste it wherever you intend to relocate it.
However, care should be taken with regard to the images inserted in your blog using the "Add Image" tool, since <a> .... </a> tags surround the code relating to the image to make it work as a link. If you are just removing the <img> tags, this code would become useless. Include the anchor tags in your selection before you cut the code or remove it. |

| Re aliging the image | |
• Compose Mode
Re alingment of the image is not possible from the compose mode. You need to switch to HTML mode and change the HTML code.
• HTML Mode
Realigning the image needs you to set or change the align attribute within the < img > tag. [Eg: <img ... align=right .... >]. You can use the values "left" or "right" to make the image float and the values "top", "middle" or "bottom" to make the image inline with text.
The alignment can also be set with the style property "float". [Eg: <img ... style="float:right" .... >]. You may use the values, right, left to float the image. |
| Resizing the image | |

• Compose Mode
To resize the image, hold the square unfilled boxes on the image boundary and drag. As you point at the unfilled box, it gets filled.
You can notice a dotted boundary indicating the new size of the image. You can also notice a tool tip displaying the new size of the image and the change in height and width of the image if you resize the image to the point indicated by the dotted border. After completing resizing, if you check the HTML code, you can notice changes made to the values of the height = "__" and width = " ___ " attributes within the <img> tag. The new dimensions of the image would be set as the values for these attributes. • HTML Mode
Resizing the image needs you to change the height and width attributes within the < img > tag. [Eg: <img ... height = 200px width=400px .... >]. You need to add them if they are not present already.
The height and width of the image can also be set using the height and width properties within the style attribute [Eg: <img .... style="height:200px; width:400px" .... >] You have to be aware that the style properties have precedence over element attributes. Thus if you are defining the height and width twice the dimensions in the style properties would be adopted. |
| Making a Copy of the image | |
• Compose Mode
To make a copy of the image,
You can also use this option:
• HTML Mode
Making a copy of the image needs you to just copy the code relating to the image and paste it at the new location where you want the copy to appear.
|
| Undo/Redo | |
|
Both in compose mode as well as HTML mode, you can use the actions undo (for undoing the previous action ) and redo (for redoing the actions undone) in a sequential manner.
You can use the keyboard shortcuts Ctrl + Z (undo) and Ctrl + Y (redo) or the menu options Edit | undo and Edit | redo for the same. |
| Author Credit : The Edifier | ... Continued Page 21 |